

Enjoy working with AquaSoft Stages
Thank you for your interest in AquaSoft Stages. Your download will start automatically within the next few seconds.
In case the download does not start automatically, please click here.
Get started with AquaSoft Stages
Step 1: Download of the installation file
The download starts automatically within a few seconds. Alternatively, you can also download the program manually.
You can find your download here in your web browser:

In the top status bar
Depending on your Internet connection, downloading the program takes just a few seconds or a few minutes. Your Internet browser will show you when the download has been successfully completed.
Step 2: Installing the software
Start the installation by double-clicking on the downloaded file. The installation wizard will then guide you through the process.

After completing the installation, you can start the program directly and test it for 14 days free of charge and without obligation.
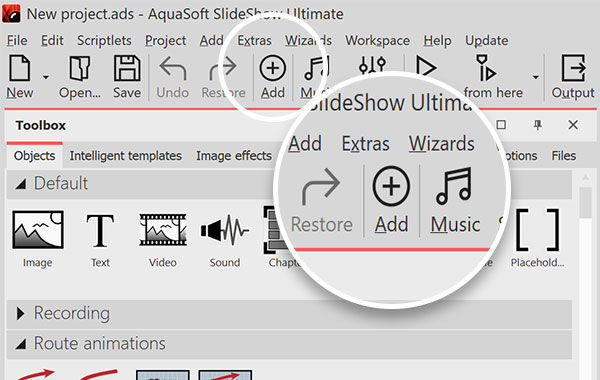
Add photos and video
With just a few clicks, you can create your first slideshow. Click the large plus (+) icon on the toolbar and select your images and videos. You can repeat this step at any time to add more images.
Alternatively, you can drag an image from the Toolbox directly to the Timeline or the Layout designer.
You can move images in the Timeline around by clicking on them with your mouse and dragging them to the desired space.
Use the storyboard, with its clear overview, if you want to sort your images.
Additional information about adding photos is available in the online manual under "Adding images".
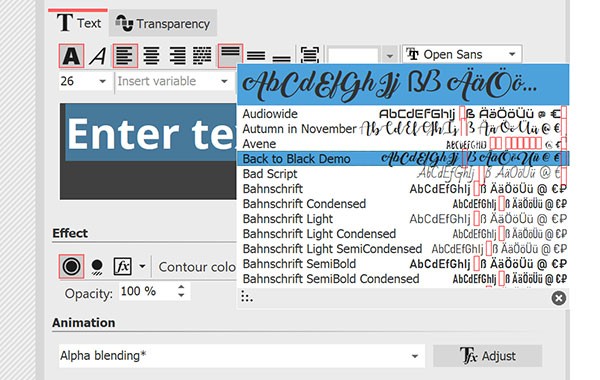
Adding captions/titles to images
Captions may be easily added to one or more images. Select the image in the Timeline and click the "Text" tab in the "Object settings" window. Now, you are able to enter your image caption, change the font style and color, and select special effects and animation.
To position text, simply move it with the mouse within the Layout designer.
Note: you can set your own default font under Extras -> Program settings -> Default image settings.
Additional information about adding and formatting image captions is available in the manual under "Adding captions to images".
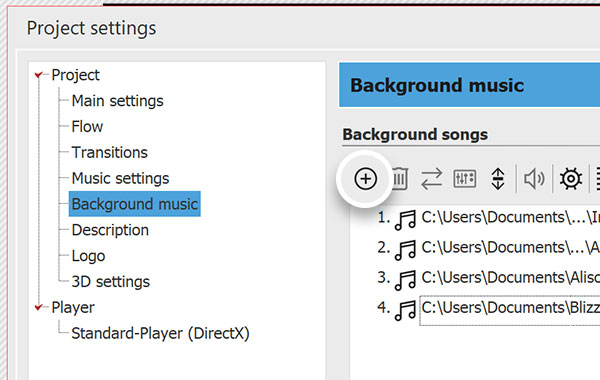
Adding sound
Click the music note icon (♪) to open the background music list. Next, click the plus (+) icon to select the desired music files. You can change the order of the list by using your mouse to drag and drop the files.
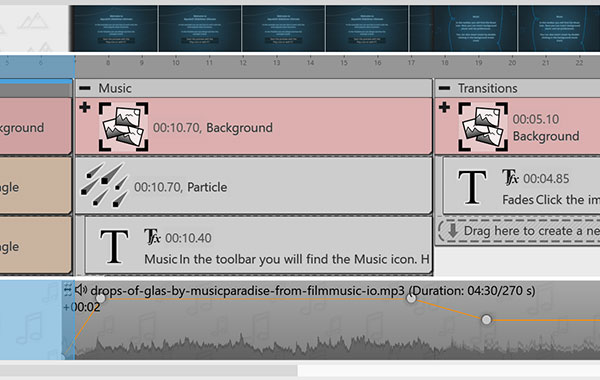
The order and length of the songs will be displayed as a wave along the bottom track of the Timeline. Here, the songs can be rearranged, shortened, and overlapped, and you can adjust the volume by using the volume rubberband.
Note: Sounds are not background music. You can drag them from the Toolbox directly to the Timeline or assign them directly to an image. The are no limitations on the number of sounds that can be simultaniously played.
If you would like to learn more about background music in AquaSoft Stages, look under "Background music" in the online help.
Multiple tracks and animations
For those who want more, AquaSoft Vision and Stages offer a wide range of animation and design capabilities. The programs offer an unlimited number of images and sound tracks. The tracks are not visible right away, but become available by adding chapters. Drag a chapter from the Toolbox to the Timeline and add images or other objects from the Toolbox to the chapter. In its expanded state, you will see the field where you can create new tracks. Chapters can also be nested.
Additional information about using the chapter element can be found in the online help at "Working with multiple tracks".
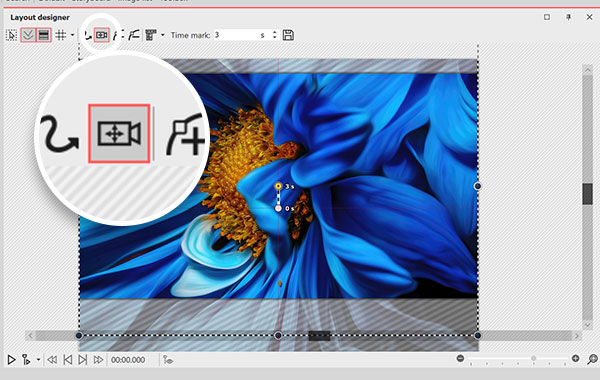
Ken Burns Effect and Zooming/panning
Select an image that you want to zoom into and activate the "Zoom and camera pan" function in the Layout designer via the camera icon. The dashed selection frame marks the visible area when you start your movement.
Add another time marker with the plus symbol. Resize the dashed frame and move it to the detail of the image that should be zoomed in. If you increase the value of the second time marker, the duration of the zoom will increase.
Run this action in the Layout designer to check the result.
To pan across an image, for example, to create a panorama or a portrait, you also have to enable the "Edit zoom & camera pan" in the Layout designer. For a left-to-right pan, resize the selection frame and move it to the left edge of the image. Add another marker and select the section at the right edge of the image. Increase the second marker's timer to make the pan run slower.
Tip: Combine zooms and pans subtly to slowly draw the viewer's eye across your scene.
Detailed instructions on zooms, camera pans, and the Ken Burns effect can be found in our handbook.
Looking for even more inspiration and ideas?
The creative possibilities in Vision and Stages are endless.
Stay up to date on the blog with the latest tutorials, example slideshows, and photography tips. On Facebook we have lots of good articles and shareable quotes and photos. Finally on YouTube we have quick tips and extended tutorials. Whether you are interested in HD/Blu-ray, for travel route animation, cinematic effects or universal aperture, it's always well worth a visit.