|
<< Click to Display Table of Contents >> Image |
  
|
|
<< Click to Display Table of Contents >> Image |
|
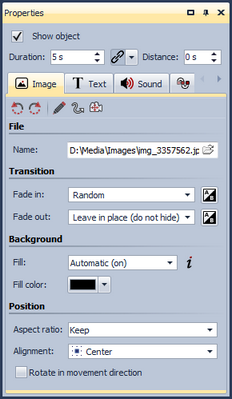
In the Properties of an Image you can configure the following settings:
|
Rotates the image counterclockwise. |
|
Rotates the image clockwise. |
|
Opens the Image editor. |
|
Specifies a movement path. |
|
Specifies a camera pan. |
File name |
Shows the path and file name of your image. |
Aspect ratio |
Images have an aspect ratio which is comprised of the height and width of the image. If an image differs from the aspect ratio of the project, it can be decided here how the image should be represented. Keep: The image retains borders when being played back. Crop: Parts are cropped from the edge of the image until the image fits into the correct aspect ratio without edges emerging. Distort: The image is inserted using the aspect ratio of the project, whereby a distortion of the image takes place. |
Alignment |
Determines the position of the image on the screen. |
Rotate in direction of movement |
If you assigned a movement path to an image you can let the image automatically rotate along the path. This function is only available in AquaSoft Stages Ultimate. |
Fill background |
On = Background gets a color filling when display size of the image is reduced. Off = Background doesn't get a filling and the previous object "looks through". For images inside collages or Picture-in-Picture effects it has to be Off. Automatic = SlideShow sets filling to On automatically for images/videos/collages in the first track. If you move an object to the second or a lower track filling will be set to Off. This way Picture-in-Picture effects can be created quickly. If you want to the value to remain select it from the drop-down box. |
Transition |
Here the Transition can be set or also deselected. For that purpose, in the drop-down list there is None as the first option. With the Adjust button, the transitions can be configured. You can also obtain a preview of all transitions there. |
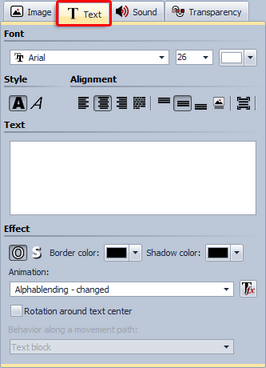
The possible formats are almost always self-explanatory through the icons and you are no doubt familiar with them already from other text programs.
The Alignment, however, has a minor peculiarity.
|
Positions the text at the lower edge of the screen. |
|
The text is shown in the center of the screen. |
|
Positions the text at the upper edge of the screen. |
|
Places the text freely in order to determine the position in the image individually. |
|
The text is shown underneath the image. That also applies if the image is shown reduced in size. |
If you don't wish to have separate text animation, activate the option Show text with image.
Should the text be shown animated, you can select various ready-made animations from the list. You can still adjust the animation using the Edit button. You can also see a preview of the animations there.
Rotation around text center refers to animations in which the text is rotated. Under Edit you can also determine a different rotation center.
With Behavior along a movement path you can specify how text gets displayed when it moves along a movement path. You can choose if the whole text shall move as a block or even as separate characters along a movement path. In the latter case the characters "snuggle up" to the path.
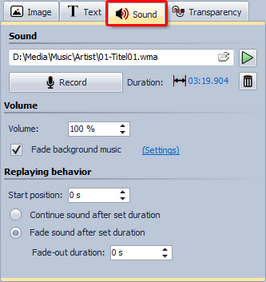
Folder icon |
Using the yellow folder you can assign commentaries or pieces of music already included to an image. |
Play icon |
Plays back the music file assigned to. |
Record |
Opens the Sound Wizard and you can then record a commentary to go with the image. |
Volume |
Determines the volume of the sound when played back. |
Fade background music |
You can determine whether the volume of the background music should be faded/decreased when playing back the sound. |
Adjust display duration to sound duration |
Plays back the sound in its entirety and thereby adapts the exposure time of the image to the length of the sound. |
Continue sound after end of image |
With this option the image can have a shorter duration than the sound. The sound then simply continues to be played on into the next images until it has come to an end. |
Fade-out sound after end of image |
Should the exposure time of the image have come to an end, but the sound be longer, with this option the sound is faded out at the end of the image. Under Duration you can set the fading out time. |
Animated transparency is described in the design options under Animated transparency.